Saturday, October 13, 2018

Apple Pie Oatmeal Bars

     When I was ten, my best friend and I made these scrumptious apple pie oatmeal bars on our own. To our delight everyone who ate them loved them! This past week I made them for the first time in a few years. And again these apple pie oatmeal bars were received extremely well by my family and our friends! I plan to continue to make them throughout the fall and hope that you love these bars as much as I do!

                                          @ 4 Goodness Bake!

Recipe Notes

     This recipe is great for those who are just beginning to bake or just want a simple recipe. If you don't have or don't want to use butter you can substitute it for coconut oil. If you don't want the apples to get to soft and turn into a paste I recommend that you cut the apples into 1/2 in. by 1/4 in. pieces. I personally like the apples this size, but do whatever works for you.

                                    @ 4 Goodness Bake!


Ingredients:
Apple Pie Filling
3 cups apples, cored, peeled and chopped (next time, we'll put 4 cups)
2 tbsp butter
¼ cup brown sugar, firmly packed
2 tbsp flour
1 tsp vanilla
1 tsp cinnamon
2 tbsp water
¼ tsp salt
Oatmeal Bars
1½ cups flour
1½ cups oats
1 cup brown sugar, firmly packed
1 tsp baking powder
½ tsp salt
½ cup plus 6 tbsp butter, cut into pieces

Directions:
Preheat oven to 350F. Grease a 9x13 inch baking pan. Set aside.

Apple Pie Filling
Combine all ingredients in a medium size saucepan and cook on medium heat until apples are softened and sauce is thick and sticky. It should have the consistency of caramel. Remove from heat.
Oatmeal Bars
Put all ingredients in the bowl of your electric mixer and beat until well combined.
Press half of the mixture onto the bottom of the greased baking pan. On top of that, spread the apple pie filling in an even layer. Top with the remaining oat mixture, crumbling it up.

Bake for about 30-40 minutes. Cool completely before cutting into squares or scoop while still warm and serve with some scrumptious homemade vanilla ice cream. I personally like them best when cooled, but I guarantee you will love them either way! :) Let me know if you make them!

Recipe adapted from: realhousemoms.com

Thursday, October 11, 2018

        Hi guys! I am Anna Nigro; the daughter of the founder of this blog, Nadia Nigro. Even though I am only thirteen I truly love food and the art of preparing it. Thanks to my mom, my grandma "Baba", and this blog I have grown up in a household that loves to make (and eat) food. Some of my earliest memories include, helping my mom and Baba cook food for our family and friends. As the years continued, I spent a great deal of time in the kitchen and eventually found my own cooking and baking style. One of the greatest joys in my life is being able to cook and bake for my family and friends. Through this blog I hope that I can make it one of yours!

    In taking over my mom’s blog I plan to expand it to cooking, but don’t worry, I will continue to write about baking as well. Every week I will bring new recipes, tips, and stories from my kitchen to yours. I am so excited and feel immensely privileged to begin this journey of food with you. I can’t wait to begin!
                  With love,
                       Anna Nigro

Friday, February 20, 2015

Breast and Bra Cake :)))

This week, I was asked to make a cake as a practical joke for the birthday of an 80-year-old guy. :) Adult cakes are not my usual kind of work, to say the least, but I didn't really want to say "no" to my husband's coworker (who had planned the joke), plus I do like a challenge every once in a while. So, on with the challenge I ran! :)

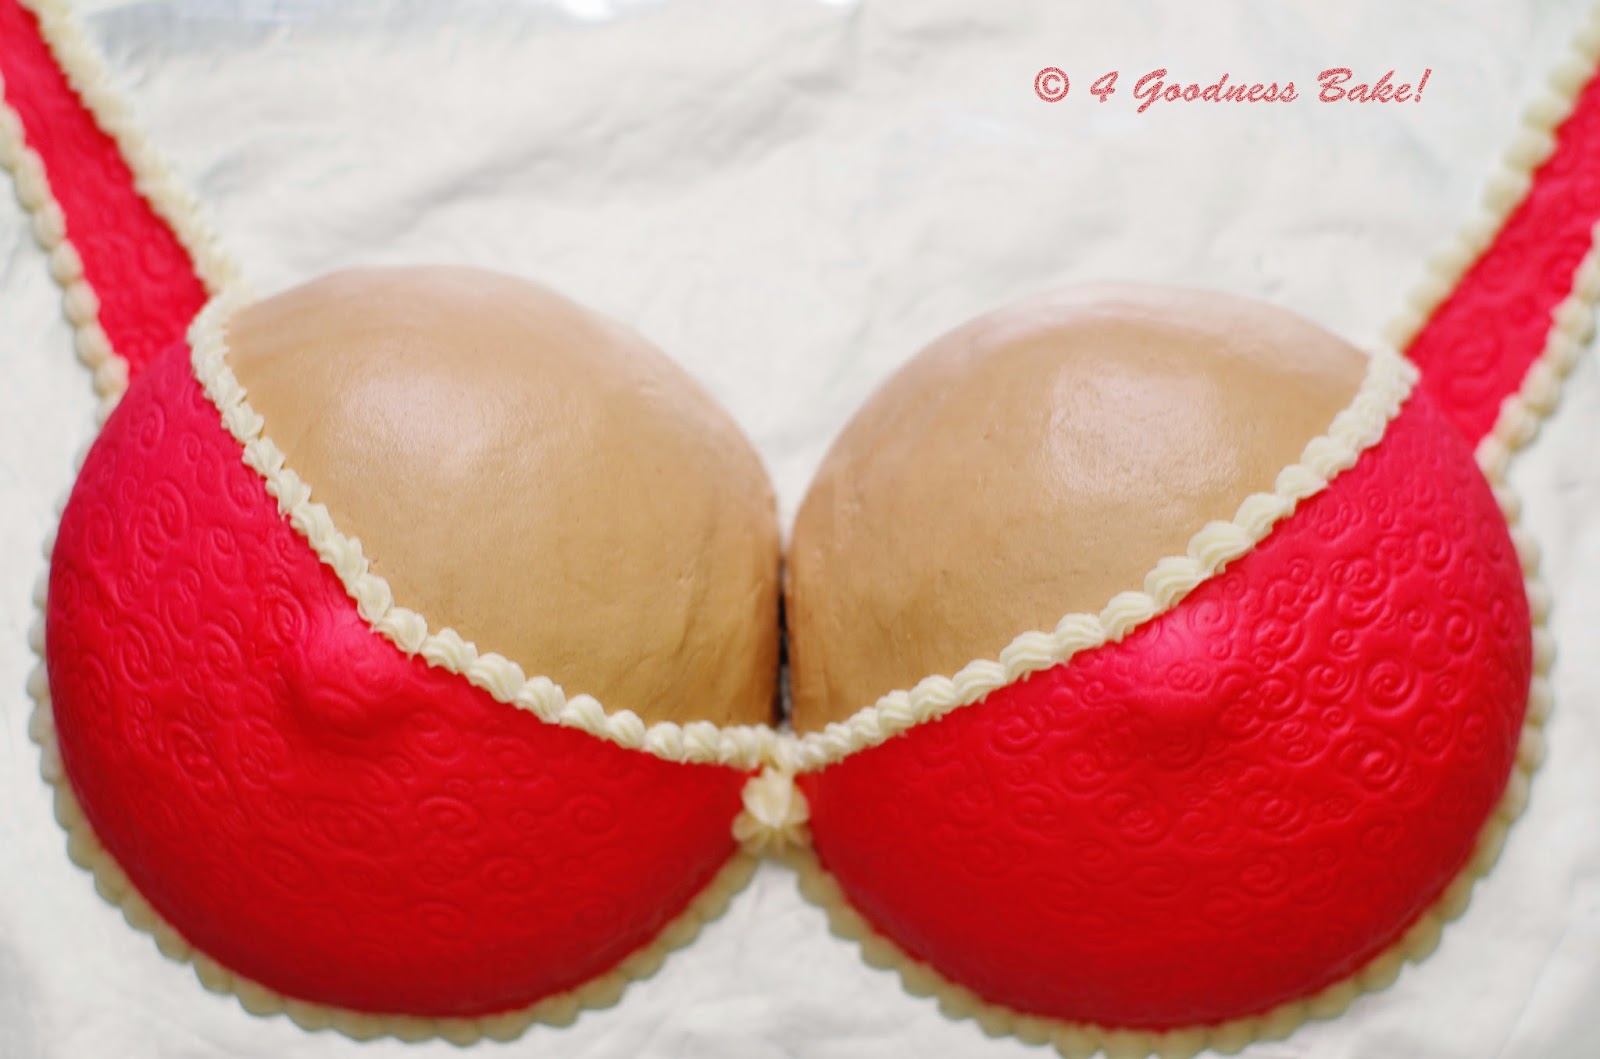
Apart from the obvious- that it is a breast and bra cake- it was actually a dark chocolate cake filled with whipped chocolate ganache, frosted with peanut butter frosting, and decorated with my homemade marshmallow fondant and buttercream frosting. I am including all the recipes below, as well as tips on making this particular cake, for any adult cake enthusiasts out there. :)


I used two 6" semi-sphere Wilton pans in which I baked my favorite recipe for dark chocolate cake but modified the temperature and baking time to account for the fact that I was working with domes, not regular flat pans. I normally bake this cake at 350F, but in this case I had the oven set at 325F. Also, instead of the usual 25 minutes or so in two 8" round cake pans, I baked these for a little over 30 minutes. Baking the cakes at a lower temperature but for a longer time ensured that they baked more evenly- this way, I avoided overbaking the outside of the cake and having a hard crust. The recipe I have produces a little more batter than is necessary for the two 6" pans, so I just baked a few mini cupcakes with the extra batter. :)

Dark Chocolate Cake

Ingredients:
  • 1 3/4 cups all-purpose flour
  • 1 3/4 cups sugar
  • 3/4 cup cocoa powder
  • 2 tsps baking soda
  • 1 tsp baking powder
  • 1/2 tsp kosher salt
  • 1 cup buttermilk, shaken
  • 1/2 cup vegetable oil
  • 2 eggs, room temperature
  • 1 tsp vanilla extract
  • 1 cup hot coffee
Directions:
Preheat the oven to 325 degrees F. Butter and flour two 6-inch semi-sphere cake pans (or use “PAM for Baking”).

1. Sift the flour, sugar, cocoa, baking soda, baking powder, and salt into the bowl of an electric mixer fitted with a paddle attachment and mix on low speed until combined.

2. In another bowl or large measuring cup, combine the buttermilk, oil, eggs, and vanilla. Gently whisk.

3. With the mixer on low speed, slowly add the wet ingredients to the dry. With mixer still on low, add the coffee and stir just to combine – scrape up from the bottom to make sure all the flour is incorporated. Batter will be very runny, but that is okay- this is a very moist cake!

4. Pour 2 1/2 cups of batter into each of the prepared pans and place them on top of a cookie sheet. This way, the batter that may spill over will end up in the cookie sheet and not all over your oven. The reason for overfilling your pans slightly and even letting them overflow a little is because you want them to bake by filling the pans completely once they are done. Only this way can you have perfect semi-spheres as the final product- you may need to level them off a little bit by cutting the tops slightly. Also, as I mentioned above, this recipe produces a little more batter than you need for this particular size and shape of cake pans, so you can just make a few mini cupcakes with the extra batter (an added bonus!). :)

5. Bake for about 30 minutes or until a toothpick inserted in the center comes out clean. Cool in the pans for 10 minutes, then turn them out onto a cooling rack to complete cooling.


Whipped Chocolate Ganache

Ingredients:
12 oz (about 2 cups) semisweet chocolate chips or chopped chocolate
1 cup heavy whipping cream

Directions:
Bring the whipping cream to a boil in a little saucepan. Watch it carefully, because it may boil over. Put the chocolate in a heat-proof bowl. Pour the hot whipping cream over the chocolate. Stir a little until the chocolate melts and mixture is smooth and glossy- it literally looks like brown velvet! :) Place ganache in refrigerator for about an hour, until ganache has cooled completely but is not yet hard- it should still be spreadable. Beat with electric mixer for about 3-4 minutes, until it becomes the consistency of frosting that can hold stiff peaks. Do not overbeat- it may become grainy! If this does happen, however, do not panic! Just melt the ganache again and run it through a fine-mesh sieve.
Use ready whipped ganache to fill your cake (I cut the dome in two horizontally and cut out some of the middle, to create a hollow spot inside- this became the home for my yummy whipped ganache!)


Peanut Butter Frosting

Ingredients:
1 cup (2 sticks) unsalted butter, at room temperature
1/2 cup creamy peanut butter (not natural)
3-4 cups powdered sugar, sifted
1 tsp vanilla extract
2-3 tbsp heavy cream or half-n-half

Directions:
In the bowl of your electric mixer fitted with the paddle attachment, beat the butter until creamy and smooth. Add the sifted powdered sugar, one cup at a time, beating on low. Mix in the peanut butter and the vanilla extract. Add the heavy cream, one tablespoon at a time, until frosting reaches your desired consistency. Frost the outside of your cake with a crumb coating- a thin layer of frosting, just to seal in the crumbs, so to say. Leave for about 30 minutes or more. Apply final layer of frosting and smooth out with a large offset spatula. Leave to dry out a little bit- another 30 minutes or more. Using a Viva paper towel, pat the frosting very carefully with your hands and smooth out any imperfections. The resulting surface should be as smooth as a lady's skin. :)))


Marshmallow Fondant

Ingredients:
16 oz mini marshmallows
1/4 cup water
1 tsp vanilla extract
2 lbs powdered sugar, divided
1/4 cup vegetable shortening

Directions:
Place the marshmallows in a large microwave-safe bowl, and microwave on High at 30 second intervals for about 1 to 1-1/2 minutes to melt the marshmallows. Carefully stir the water and vanilla extract into the hot marshmallows, and stir until the mixture is smooth. 

Transfer mixture (it will be very sticky) to the bowl of your electric mixer which you sprayed liberally with PAM or greased with vegetable shortening. Use the dough hook attachment. 
* (See note below). Beat in the confectioners' sugar, a cup at a time, until you have a sticky dough. Reserve 1 cup of powdered sugar for kneading. The dough will be very stiff. Continue kneading the fondant until the dough is smooth and no longer sticky to the touch (about 5-7 more minutes). 

Form the fondant into two balls, grease them with vegetable shortening (this prevents them from drying), wrap them tightly in plastic wrap, and refrigerate overnight. To use, allow the fondant to come to room temperature, and roll it out onto a flat surface dusted with confectioners' sugar (or if you prefer, use vegetable shortening instead- that's what I did). For this cake, I rolled out the fondant with a rolling pin that had a squiggly pattern on it, to replicate a fabric texture. I was pretty happy with the way it turned out.

Cut out the fondant into two large triangles and lay each one on the "breasts" for a bra. :) Trim off any excess.


* Note: If you are using all of the fondant in one color, the easiest way is to add your food coloring at this point. However, if you need different colors, then you will have to add the coloring after the kneading stage, when you separate the fondant, and work it in by hand while kneading- I suggest using latex gloves for this, to avoid technicolor hands. :)


Finally, I used Buttercream Frosting for making the lace on the bra after I placed the fondant, and also for the writing on the cake.

Ingredients: 
1 stick unsalted butter, at room temperature
2 cups powdered sugar, sifted
1/2 tsp vanilla extract
2-3 tsp heavy cream or half-n-half

Directions:
Beat butter in the bowl of your electric mixer fitted with the paddle attachment until it is light and fluffy. Add powdered sugar gradually and beat until smooth. Add vanilla extract and cream (1 teaspoon at a time). Add desired food coloring, if using, and pipe frosting on your cake. 


I adapted the following fondant recipe: marshmallow-fondant

Thursday, February 12, 2015

Lizzie's Banana Cream Pie

This week, my daughters had a talent show at church and they both decided they were going to do art and bake! :))) Miss Lizzie (age 5) made a terrific Banana Cream Pie from scratch! I was so proud of her!

First, she measured all the ingredients for the vanilla custard, following the recipe we chose. Then, she set up a chair for herself in front of the stove and started whisking it all together in the pot! It melted my heart, watching her whisk that custard away... She whisked, and whisked, and whisked... Until it all thickened and bubbled! She was super excited!


Once, she added the tempered eggs, the custard was all ready for butter and vanilla! It looked like this:  


We covered it with plastic wrap and put it in the fridge for a while. Once cooled, it went in the pie dish lined with crackers: one layer of custard, sliced bananas, the rest of the custard. We covered it with plastic wrap again and left in the fridge overnight. Lizzie came up with the design herself and decorated it just before we had to leave for the talent show. It turned out gorgeous!


Lizzie's Banana Cream Pie
Ingredients:
 
1 cup granulated sugar
1/4 cup cornstarch
1/2 tsp salt
2 1/2 cups whole or 2% milk
2 eggs, lightly beaten
3 tbsp. butter
1 1/2 tsp vanilla extract
Graham cracker crust (or other crackers of your choice to line pie dish with; Nilla wafers work too)
1 cup heavy whipping cream, whipped
strawberries for garnish (optional)
 
Directions:
 
In a large saucepan, combine sugar, cornstarch, salt, and milk and whisk until smooth. Cook and stir over medium-high heat until thickened and bubbly. Reduce heat; cook and stir 2 minutes longer. Remove from heat. Stir a small amount of hot filling into eggs; return all to pan. Bring to a gentle boil; cook and stir 2 minutes longer.
 
Remove from heat. Gently stir in butter and vanilla extract. Press plastic wrap onto surface of custard. Refrigerate, covered, 30 minutes.
 
Spread half of the vanilla custard into Graham cracker crust or pie dish lines with crackers. Slice bananas; arrange over filling. Pour remaining custard over bananas. Spread with whipped cream or decorate to your liking. Refrigerate 6 hours or overnight.                
 
As you can see, my daughter decided to decorate this pie with whipped cream rosettes and halved strawberries and it looked beautiful. I've always liked the combination of bananas and strawberries. She was happy with it too! And we were all super proud of her! Everybody at the talent show loved her Banana Cream Pie! It was all gone! :)


Recipe adapted from: www.tasteofhome.com

Tuesday, January 27, 2015

German Pancake, aka Dutch Baby

This week, I introduced my family to a new breakfast recipe: German Pancake, also known as Dutch Baby. My daughter Anna and I were intrigued by it when we watched a program on Food Network about the best breakfast foods in the US. So, we looked up the recipe on the internet and found a few versions we liked. Here is what we ended up making and we were super pleased with the results.


The German pancake is incredibly easy to make and it can feed at least a couple of people, or in our case my three kids and me, while Daddy just had a taste. Of course, it can easily be doubled and baked in a larger skillet or dutch oven, or casserole dish. The TV program we watched showed the recipe being made with half a peach on the bottom of the skillet but since peaches are not in season now, I sliced half a banana instead and sprinkled it with just a touch of brown sugar. We had caramelized bananas on the bottom of the skillet and a light and fluffy Dutch Baby on top. Once baked, a simple sprinkle with powdered sugar on top is perfect but my kids changed things up a little bit: one added a sprinkle of cinnamon, another opted for maple syrup, while a third one drizzled honey. :) It was delicious with any one of these flavor enhancements! I am thinking that next time, I may shake it up even more and instead of going the sweet route, I may do a savory version instead and add feta cheese to the batter. But that's just me: once I find a recipe I like, I am always changing things about it. :) Here is my version for today:


Ingredients:

2 tbsp butter
3 eggs
3/4 cup milk
3/4 cup flour
1 tsp vanilla extract
1/2 banana, sliced (or fruit of your choice, optional)
1 tbsp brown sugar (nice of using bananas, you can skip if using other fruit)
powdered sugar for sprinkling on top
maple syrup, honey, or more fruit (optional)


Directions:

Put butter on the bottom of a cast iron skillet (if you do not have one, you can use a Dutch oven or a casserole dish). Place skillet in oven and set to 425F. You want a hot skillet with melted butter in it.

While oven is preheating, in a medium size mixing bowl, whisk eggs, milk, flour, and vanilla extract.
Once oven has reached 425F, take the hot skillet out using pot holders and place the sliced bananas on top of the melted butter. Sprinkle with the brown sugar and then pour the batter on top. Return to oven. Bake for 20 minutes. It will puff up a lot around the edges. It looks very cool! :)

You can sprinkle with powdered sugar and serve with additional fruit on top, or maple syrup, honey, preserves, etc... Enjoy!!!


Recipe adapted from: realhousemoms

Tuesday, November 25, 2014

Apple Crisp

 
This fall we made sure we went to our local pick-your-own apple orchard. The apples were by far the best I had had in a long, long time. But of course, we ended up picking way more than we could have eaten before they went bad. So, I had, I just had to find a recipe or two for apple desserts that use a LOT of apples. :) Naturally, apple crisp was first on the list. And boy, was it an outstanding recipe! As I always do, I tweaked it a little bit to add my own touches, so to speak, and it was gone so fast, I had to make it again the same week! My kids had fun helping me make it too. It is incredibly simple!
Served warm with a scoop of  some excellent vanilla ice cream it is truly one of the best fall desserts you could dream of!


Directions:

Saturday, November 22, 2014

Pumpkin Cream Cheese Bars

Here is a terrific twist on pumpkin pie and cheesecake! It combines the favorite fall flavors of pumpkin and pumpkin pie spice with the velvety creaminess of classic cheesecake. Plus, it is super fuss-free to prepare and a great make-ahead recipe for your Thanksgiving feast. :)


Ingredients:

Cream Cheese Filling:
1 (8 oz) package cream cheese, softened
1/4 cup granulated sugar
1 egg
1 tsp vanilla extract

Note: If you are a huge fan of cheesecake, you may want to consider doubling the cream cheese filling. I think I may do this next time. :)
 
Batter:
1 cup canned pumpkin puree (I actually used 1/2 cup pumpkin and 1/2 cup pureed butternut squash)
1/2 cup granulated sugar
1/2 cup brown sugar
1 egg
1/3 cup vegetable oil
1 cup all-purpose flour
2 tsps pumpkin pie spice
1 tsp baking powder
1/2 tsp baking soda
1/2 tsp salt
2/3 cup chopped pecans
2 tsp fresh orange zest (optional but highly recommended)


Directions:
  1. Preheat oven to 375°.
  2. Spray a 9x13" baking pan with cooking spray. Set aside.
  3. For the filling: With a hand mixer blend together softened cream cheese, sugar, egg, and vanilla until smooth. Set aside.
  4. For the batter: Combine the pumpkin, sugar, egg and oil in medium mixing bowl and mix until well combined.
  5. Stir in flour, pumpkin pie spice, baking powder, baking soda, and salt. Mix well to combine.
  6. Pour batter into prepared baking dish, and spread to cover bottom of pan.
  7. Add dollops of the cream cheese mixture over the batter. Cut through the batter with a knife to make a marbled effect w/ the cream cheese mixture in an up and down pattern. Repeat going the other way. When marbling make sure you don't go all the way to the bottom of the pan. Sprinkle with the chopped pecans.
  8. Bake for 28-30 minutes or until toothpick inserted in the center comes out clean.
  9. Cool and cut into squares. Store in the refrigerator.
  10. Zest about half an orange on top of the bars just before serving. It adds wonderful brightness to the flavor profile of this delicious dessert.
  11. Enjoy!

Recipe adapted from: The girl who ate everything

Monday, November 17, 2014

Apple Walnut Muffins

These Apple Walnut Muffins are another fantastic installment in my fall recipe collection. But really, they would be terrific at any time of year! I was blown away by their moistness and how light and flavorful they were. In fact, they were so incredibly yummy, I ended up making them for my family twice in one week! :) They are not overly sweet and they are bursting with flavors- apples, cinnamon, walnuts... Such a great breakfast or anytime snack, also perfect with a cup of nice coffee or tea.


Ingredients
4 eggs
1 cup brown sugar
2/3 up oil (canola, vegetable, or coconut...)
2 cups all-purpose flour
1 tbsp. baking powder
1/2 tsp baking soda
1/4 tsp salt
1 tsp ground cinnamon
1 tsp vanilla extract
1 tbsp. ground flax seed meal
2 cups cored, peeled and grated apples
1/2 cup chopped walnuts


Directions:

Preheat oven to 400F. Lightly grease 2 muffin tin pans or line with paper liners. This recipe makes about 2 dozen standard size muffins.

In the bowl of your electric mixer, mix eggs with sugar and oil. Beat until well combined, about 1-2 minutes.

In a separate bowl, sift together flour, baking powder, baking soda, and salt. Gradually add dry ingredients to the egg mixture. Add vanilla extract, cinnamon, and flax seed. Mix just until incorporated.

Fold in apples and walnuts. Using a large ice cream scoop, fill muffin tins 3/4 of the way, so they can form a nice dome while baking.

Bake for about 20-22 minutes, or until a toothpick inserted in the center of a muffin comes out clean.
Cool in pans for a couple of minutes, then take out on wire racks to finish cooling. enjoy plain or with a drizzle of simple Cinnamon Glaze (recipe below).


Cinnamon Glaze

Ingredients:

1 cup powdered sugar
1-2 tbsps. milk
1/2 tsp ground cinnamon

Directions:

Mix powdered sugar with 1 tbsp. of the milk. If you prefer a thinner consistency, add more milk, 1 teaspoon at a time. Mix in cinnamon. Drizzle glaze over cooled muffins. Enjoy!

Recipe adapted from: http://www.supichka.com

Saturday, November 15, 2014

Pumpkin Oatmeal Chocolate Chip Cookies

Another great treat during pumpkin season: Pumpkin Oatmeal Chocolate Chip Cookies. Super easy to make, ultra soft and moist, simply delicious! Plus, they have oats, flax seeds, nuts, and dried fruit in them, so that makes them qualify as almost healthy. :)


Ingredients
  • 2 cups + 2 tbsp all-purpose flour
  • 1 tsp baking soda
  • 2 tsps ground cinnamon
  • 1 tsp pumpkin pie spice
  • 1/2 tsp salt
  • 1 and 1/2 cups old-fashioned rolled oats
  • 1 tbsp ground flax seeds
  • 1 cup (2 sticks) unsalted butter, melted
  • 1/4 cup dark molasses
  • 3/4 cup brown sugar
  • 1/2 cup granulated sugar
  • 1 egg
  • 3/4 cup pumpkin puree
  • 1 tsp vanilla extract
  •  1/2 cup chocolate chips (white, dark, milk- whatever floats your boat!)
  •  1/2 cup chopped dried apricots
  •  1/2 cup chopped pecans
    (if you prefer to use different add-ins, that is perfectly fine; the possibilities are endless here- any dried fruits or nuts/seeds would work perfectly, just keep the total amount of add-ins to 1 and 1/2 cups)


  • Directions:

    Preheat oven to 350F. Line two baking sheets with parchment paper or silicone mats (I love my Silpat!)

    In a large mixing bowl, combine flour, baking soda, ground cinnamon, pumpkin spice, salt, oats, and flax seed. Set aside.

    In a medium size bowl, mix the melted butter, molasses, and sugars. Once combined, mix in the egg. Add pumpkin puree and vanilla extract and whisk until thick and fully incorporated. Add to the dry ingredients and mix until just combined. The resulting dough will be heavy and sticky.

    Gently fold in the chocolate chips, dry apricots, and pecans (or other add-ins of your choice). Scoop cookie dough onto the cookie sheets- I use a medium size ice cream scoop that works great for this purpose. Flatten cookies just a little bit before putting in the oven.

    Bake at 350F for 12-14 minutes, or until slightly brown around the edges (it took exactly 12 minutes for mine). Cookies will still be soft when you take them out. Allow to cool completely on the cookie sheets before transferring to an airtight container. The cookies keep soft and moist for more than a week and you can also freeze them for a couple of months. They are truly delicious!

     
    Recipe courtesy: pumpkin oatmeal cookies

    Wednesday, November 12, 2014

    The Perfect Fall Salad!

    I love fall and I absolutely love salads... And I think I just may have managed to reach perfection when it comes to combining fall flavors- and colors- into a salad bowl. I have made my fair share of salad combos in my many years of daily salad consumption and I can truly declare this arugula salad mixed with roasted butternut squash and topped with chopped pecans, crumbled gorgonzola cheese and succulent (and oh, so good for you) pomegranate seeds to be my winner in the fall category. Hands down. It is not only beautiful (yes, breathtakingly beautiful!) to look at, but more importantly- it will send your taste buds over the moon and back with every. single. bite. Bursting with richness of flavors, delighting with a variety of textures, and so esthetically pleasing to the eye, this is by far The Perfect Fall Salad.


    Ingredients:

    (serves 2-4, depending on whether you are serving it as a first course or as an entrée)

    3 cups arugula
    1 cup roasted butternut squash *
    1/2 cup pomegranate seeds
    1/4 cup chopped pecans
    1/4 cup crumbled gorgonzola cheese
    a simple drizzle of olive oil and the vinegar of your choice, to taste
    freshly ground sea salt and black pepper, to taste

    Directions:

    In a large salad bowl, lay arugula and top with butternut squash, pomegranate seeds, chopped pecans, and gorgonzola cheese. Drizzle olive oil and vinegar just before serving. Season with salt and pepper to taste. Enjoy as a first course at lunch or as a light but super satisfying and nourishing dinner entree.

    * I roast peeled and chopped butternut squash with a drizzle of olive oil in a 450F oven for about 40-45 minutes, or until cooked through. Sometimes I add a chopped onion as well- it adds a nice flavor when it roasts and gets caramelized. It's a great side dish or an addition to salads, such as this one.


    Friday, October 24, 2014

    Pumpkin Scones with Spiced Glaze

    To keep in line with the fall spirit here, I have another pumpkin recipe for you today: Pumpkin Scones with Spiced Glaze! If you are a fan of scones and like pumpkin, well, this is right up your alley then! They are very easy and fast to prepare and since they are not too sweet, they make the perfect breakfast or snack at any time of day. The spiced glaze lends an extra flavor dimension to them with the warmth of cinnamon, nutmeg, ginger, and cloves... Let's celebrate the season! :)
     
     
    Pumpkin Scones

    2 cups all-purpose flour
    7 tbsp. granulated sugar
    1 tbsp. baking powder
    1/2 tsp salt
    1/2 tsp cinnamon
    1/2 tsp nutmeg
    1/4 tsp ground cloves
    1/4 tsp ground ginger
    6 tbsp. cold unsalted butter
    1/2 cup canned pumpkin puree
    3 tbsp. half-n-half
    1 egg

    Directions:
    Preheat oven to 425F.
    Mix dry ingredients. Add butter and cut it in using a pastry blender or in food processor. Combine wet ingredients and fold them into dry mix until just incorporated. Form into a ball. Do not knead!
    * The key to flaky scones is to handle the dough as little as possible.* Pat the dough onto lightly floured surface to about 1 inch thick. Cut in triangles. Bake for about 14-16 minutes. Transfer to wire racks to cool. Once cooled, drizzle with Spiced Glaze.


    Spiced Glaze
    1 cup plus 3 tbsp. powdered sugar
    2 tbsp. milk or half-n-half
    1/4 tsp cinnamon
    1/8 tsp nutmeg
    a pinch each of ground ginger and ground cloves

    Mix all ingredients together until smooth and drizzle over cooled scones. Enjoy!!! :)


    Recipe courtesy: browneyedbaker.com
     

    Wednesday, October 22, 2014

    Pumpkin Cookies with Maple Glaze

    
    Yes, it is fall!!! In my book, that means pumpkin season, apple season, pear season- you get my meaning... :) I have a ton of recipes with all these ingredients waiting to be posted here, like the Pear-Pecan Muffins I just blogged about yesterday. :) Here is a new recipe for cookies with a delightful pumpkin flavor and maple glaze that are just perfect for this time of year. I made these for a ladies' gathering at our church this week and was asked for the recipe multiple times. So, here it is, as promised: super easy to make and just right to satisfy any pumpkin lover's cravings.

     
    Pumpkin Cookies
    (makes about 5-6 dozen cookies)

    1/2 cup (1 stick) unsalted butter, at room temperature
    1 cup brown sugar
    1 cup granulated sugar
    2 tsp vanilla extract
    1 cup pumpkin puree
    3 1/2 cups all-purpose flour
    1/2 tsp salt
    2 tsp baking powder
    2 tsp cinnamon
    1 1/2 tsp pumpkin spice
    1/2 tsp ground ginger

    Preheat oven to 375F.
    In the bowl of your electric mixer, cream butter and sugars together for 1-2 minutes.
    In a separate mixing bowl, combine flour with baking powder, salt and spices. Set aside.
    Once butter and sugars are creamed, add pumpkin puree and vanilla extract and mix to incorporate.
    Gradually add dry ingredients to the pumpkin mixture and beat until just incorporated.
    Using a medium-size cookie/ ice-cream scoop or a spoon, drop batter onto lightly greased cookie sheets (or on sheets lined with silicone mats), about 1 inch apart. If you like smoother looking cookies, shape each one into a ball with your hands, place on baking sheets and slightly flatten out with your fingers.
    Bake for about 12-14 minutes. Cookies should still feel soft when you take them out, they will harden a little as they cool. Do not overbake. Transfer to wire racks and leave to cool.
    Once cooled, the cookies can be glazed. I used the following Maple Glaze which complemented the cookies perfectly.

    
    Maple Glaze

    2 cups powdered sugar
    2 tsp vanilla extract
    4-5 tbsp maple syrup
    4-5 tsp milk (or more, to reach desired consistency)

    Mix all ingredients together, adding the milk just a teaspoon at a time, until it reaches the desired consistency. If you want the glaze runnier, to just dip the cookies in, you can add more milk. I left mine a little stiffer and then filled it in a little zip-lock bag, snipped one corner of it and drizzled the cool cookies with the glaze.


    Recipe adapted from: realhousemoms.com

    Print recipe

    Related Posts Plugin for WordPress, Blogger...